Why does my game crash, freeze, or display a blank screen?
Your computer's current graphics configuration may not be compatible with the game. Try downloading the latest video card driver for your system, installing some simple updates, or adjusting your graphics settings.
Follow the steps in this article if your game is:
- Crashing
- Freezing
- Showing a blank screen
- Failing to open
Suggested troubleshooting steps:
Click a step in the list below for directions:
- Update your video card driver
- Install software updates
- Adjust graphics settings
- Uninstall and reinstall the game
Not playing on a PC?
Check out the help article for your device below:
- Mac: Mac Game Troubleshooting
- Android&IOS: General Help for Mobile Games
Step One: Update your video card driver
The video card driver tells the computer how to display images on the screen. Manufacturers often release driver updates to keep things running smoothly, so it's important to dowload them when they're available.
Select your operating system below and follow the steps to identify which video card you have installed. Then see if any recent driver updates have been released by your computer or video card manufacturer.
-
Windows XP
- Click the Start button and select Run.
- Type dxdiag into the text box and click OK to open the DirectX diagnostic tool (DxDiag).
- If you have a 32-bit system, click Save All Information, or if you have a 64-bit system, click Run 64-bit DxDiag. Save the DxDiag report to your desktop.
32-bit system

64-bit system

- From your desktop, open the DxDiag text file and take note of your System Model, which is shown under the System Information heading at the top of the document.
- Scroll down to the Display Devices heading to view your video card information.
- Take note of the following information:
- Card name
- Manufacturer
- Driver Date/Size
- Using the information above, locate and download the latest driver for your video card.
If you own a Dell, HP, or Compaq computer, visit the website for your PC manufacturer. If you're using a different brand of computer, you can contact your video card manufacturer directly.
Computer Manufacturers Video Card Manufacturers Compaq ATI / AMD Dell Intel Hewlett-Packard nVidia
-
Windows Vista/7
- Open the Start menu (Windows button) in the bottom left of your screen.
- At the bottom of the Start menu, type dxdiag into the Search box and press the Enter key to open the DirectX Diagnostic Tool (DxDiag).
- If you have a 32-bit system, click Save All Information, or if you have a 64-bit system, click Run 64-bit DxDiag. Save the DxDiag report to your desktop
32-bit system

64-bit system

- From your desktop, open the DxDiag text file and take note of your System Model, which is shown under the System Information heading at the top of the document.
- Scroll down to the Display Devices heading to view your video card information.
- Take note of the following information:
- Card name
- Manufacturer
- Driver Date/Size
- Using the information above, locate and download the latest driver for your video card.
If you own a Dell, HP, or Compaq computer, visit the website for your PC manufacturer. If you're using a different brand of computer, you can contact your video card manufacturer directly.
Computer Manufacturers Video Card Manufacturers Compaq ATI / AMD Dell Intel Hewlett-Packard nVidia
-
Windows 8
- Move your mouse cursor over the lower right corner of the screen. Several icons should show up on the right side of your screen.
- Click the Search icon to go to the Apps and Search screen.
- Type dxdiag into the Search. The DxDiag app will show up in the search results.
- Run the DxDiag app by clicking on it.
- If you have a 32-bit system, click Save All Information, or if you have a 64-bit system, click Run 64-bit DxDiag. Save the DxDiag report to your desktop.
32-bit system

64-bit system

- From your desktop, open the DxDiag text file and take note of your System Model, which is shown under the System Information heading at the top of the document.
- Scroll down to the Display Devices heading to view your video card information.
- Take note of the following information:
- Card name
- Manufacturer
- Driver Date/Size
- Using the information above, locate and download the latest driver for your video card.
If you own a Dell, HP, or Compaq computer, visit the website for your PC manufacturer. If you're using a different brand of computer, you can contact your video card manufacturer directly.
Computer Manufacturers Video Card Manufacturers Compaq ATI / AMD Dell Intel Hewlett-Packard nVidia
-
Windows 10
- Select the Search the web and Windows bar next to the Windows start menu.
- Type dxdiag into the search bar.
- The DxDiag app will show up in the search results. Select dxdiag.
- When the Direct X Diagnostic window finishes loading, click Save all information.
- Save the "DxDiag.txt" file to your desktop.
- From your desktop, open the DxDiag text file and take note of your System Model, which is shown under the System Information heading at the top of the document.
- Scroll down to the Display Devices heading to view your video card information.
- Take note of the following information:
- Card name
- Manufacturer
- Driver Date/Size
- Using the information above, locate and download the latest driver for your video card.
If you own a Dell, HP, or Compaq computer, visit the website for your PC manufacturer. If you're using a different brand of computer, you can contact your video card manufacturer directly.
Computer Manufacturers Video Card Manufacturers Compaq ATI / AMD Dell Intel Hewlett-Packard nVidia
Step Two: Install the latest software updates
To work properly, most newer games need the latest version of Microsoft DirectX, a program used to display the game's graphics. Follow the steps below to update DirectX for Windows XP and Vista (Windows 7 and 8 already use the latest version):
-
Windows XP
- Go to the DirectX End-User Runtime Web Installer page.
- Click the Download button and select Run. (If you're using Firefox as your web browser, select Save File.)
- Run Microsoft DirectX setup to begin installing the latest version.
- Once complete, try playing your game.
-
Windows Vista
Check your version of DirectX
First, check to see if you already have the latest version of DirectX by following these steps:
- Open the Start (Windows) menu in the bottom left of your screen.
- At the bottom of the Start menu, type dxdiag into the Search box and press the Enter key to open the DirectX Diagnostic Tool.
- Check your DirectX Version, which is found in the bottom line of the System Information section.
- If your DirectX version is lower than 11, please follow the next set of steps to update.
Update DirectX
- Go to the Windows Vista Graphics Update page.
- Click the Continue button and follow the steps listed on the page to (1) create a validation code and (2) enter the code.
- After Microsoft validates your version of Windows, click the orange Download button to begin the download.
- When finished downloading, please run the file to install the Windows Vista graphics update
-
Windows 7, Windows 8/8.1, Windows 10:
Continue on to step four below.
-
Mac users
To ensure the best game performance, install the latest software updates from Apple:
Step Three: Adjust your graphics settings
If you're using Windows Vista, Windows 7, Windows 8, or Windows 10, please see below for steps to adjust your graphics settings.
-
Windows Vista
Adjust the Dots Per Inch (DPI) Setting
The Dots Per Inch (DPI) setting affects how images are displayed on your screen. Some games may have trouble displaying if the DPI is set too high or too low. Please check your DPI and adjust if necessary.
- Open the Start Menu.
- Click Control Panel.
- Click Appearance and Personalization.
- Click Personalization.
- Click Adjust Font Size (DPI).
- Select Default Scale (96DPI).
- Click OK and you'll see a prompt to reboot your computer.
- Click Yes.
After restarting the computer, please try playing the game again. If the issue continues, please proceed to the steps below.
To minimize game freezing and slowness, run the game in XP compatibility mode and/or disable the Aero appearance setting. First, make sure you have the ability to view hidden files:
Show hidden files
- Open the Start (Windows) menu in the bottom left corner of your screen.
- Select Computer then Local Disk (C:) then Program Files. (If you have a 64 bit system, open the Program Files (x86) folder instead.)
- Find and open the folder for your game.
- Near the top of the folder window, click Organize and then select Folder and Search Options from the menu.
- Click the View tab.
- Select Show hidden files and folders.
- Click Apply then OK.
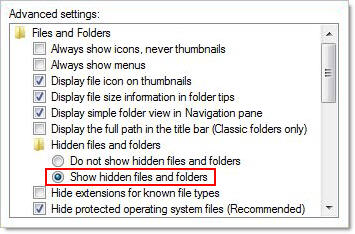
Now the application file for your game should be visible and you can proceed with the following steps to run the game in compatibility mode.

Run game in XP compatibility mode
- From the game folder, right-click your mouse on the application file (example in above picture) and select Properties.
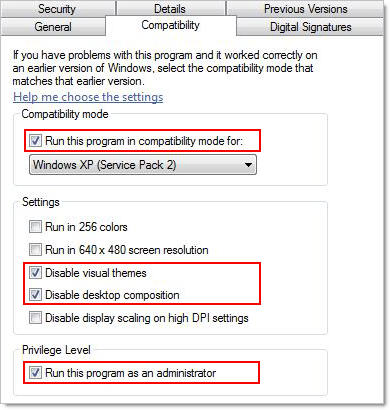
- Select the Compatibility tab at the top.
- Check Run this program in compatibility mode for: Windows XP (Service Pack 3).
- Check the boxes to Disable visual themes and Disable desktop composition.
- Check Run this program as an administrator.
- Click Apply then OK.
- Delete the shortcut icon for your game, which is usually found on the desktop.
- Afterward, open the Game Manager and then click the Play button to start your game.
Once a game is selected to run in XP compatibility mode, it can no longer be opened from the shortcut game icon which is usually located on the desktop. Instead, make sure to start your game by first opening the Game Manager, then clicking the Play button next to the game title.
Disable Aero Setting
The Aero design is the standard appearance setting for Windows Vista. To improve the performance of your game, you can easily disable Aero and use a simpler appearance setting.
- From your Vista desktop, right-click your mouse and choose Personalize.
- Select the Window Color and Appearance link.

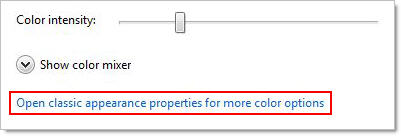
- Next, click on the Open classic appearance properties for more color options link.
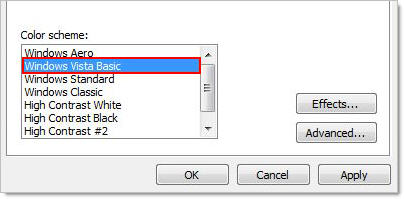
- From the Appearance Settings window, select Windows Vista Basic as the color scheme and click Apply then OK.
- When finished, try playing your game.
-
Windows 7
Adjust the Dots Per Inch (DPI) Setting
The Dots Per Inch (DPI) setting affects how images are displayed on your screen. Some games may have trouble displaying if the DPI is set too high or too low. Please check your DPI and adjust if necessary.
- Open the Start Menu.
- Click Control Panel.
- Click Appearance and Personalization.
- Click Display.
- Click Smaller - 100% (default) for the text size.
- Click OK and you'll see a prompt to reboot your computer.
- Click Yes.
After restarting the computer, please try playing the game again. If the issue continues, please proceed to the steps below.
To help with game freezing and slowness, run the game in XP compatibility mode and/or disable the Aero appearance setting. First, make sure you have the ability to view hidden files:
Show hidden files
- Open the Start (Windows) menu in the bottom left corner of your screen.
- Select Computer then Local Disk (C:) and then Program Files. (If you have a 64 bit system, open the Program Files (x86) folder instead.)
- Find and open the folder for your game.
- Near the top of the folder, click Organize and then select Folder and Search Options from the menu.
- Click the View tab.
- Select Show hidden files and folders.
- Click Apply then OK.

Now the application file for your game should be visible and you can proceed with the following steps to run the game in compatibility mode.

Run game in XP compatibility mode
- From the game folder, right-click your mouse on the application file (example in above picture) and select Properties.
- Select the Compatibility tab at the top.
- Check Run this program in compatibility mode for: Windows XP (Service Pack 2 or 3).
- Check the boxes to Disable visual themes and Disable desktop composition.
- Check Run this program as an administrator.
- Click Apply then OK.

- Delete the shortcut icon for your game, which is usually found on the desktop.
- Afterward, open the Game Manager and then click the Play button to start your game.
Once a game is selected to run in XP compatibility mode, it can no longer be opened from the shortcut game icon which is usually located on the desktop. Instead, make sure to start your game by first opening the Game Manager, then clicking the Play button next to the game title.
Disable Aero Setting
The Aero design is the standard appearance setting for Windows 7, and it uses more graphics resources than simpler designs. To improve the performance of your game, you can easily disable Aero and use a simpler appearance setting.
- From your Windows 7 desktop, right-click your mouse and select Personalize.
- A window will appear. Scroll down and select one of the Basic and High Contrast Themes. (By using one of these basic settings, you will free up video card memory to be used for your game.)
- When finished, try playing your game.
-
Windows 8
Adjust the Dots Per Inch (DPI) Setting
The Dots Per Inch (DPI) setting affects how images are displayed on your screen. Some games may have trouble displaying if the DPI is set too high or too low. Please check your DPI and adjust if necessary.
- Press the Home (Windows symbol) and x buttons on your keyboard, or hover over the bottom left corner of the screen and Right-click.
- Click Control Panel.
- Click Appearance and Personalization.
- Click Display.
- Click Smaller - 100% (default) for the text size.
- Click OK and you'll see a prompt to reboot your computer.
- Click Yes.
After restarting the computer, please try playing the game again. If the issue continues, please proceed to the steps below.
To help with game freezing and slowness, run the game in XP compatibility mode and/or disable the Aero appearance setting. First, make sure you have the ability to view hidden files:
Show hidden files
- From your Windows 8 desktop, move your mouse into the lower-left corner of your screen and right-click.
- Click on the Search icon.
- Type Folder Options into the search box and press the Enter key.
- Click on Settings in the categories below the search box.
- A Folder Options icon will appear to the left. Go ahead and click it to open the Folder Options window.
- Click on the View tab at the top of the Folder Options window, then make sure that the setting to Show hidden files, folders, and drives is checked in the list.
- Click Apply then OK.
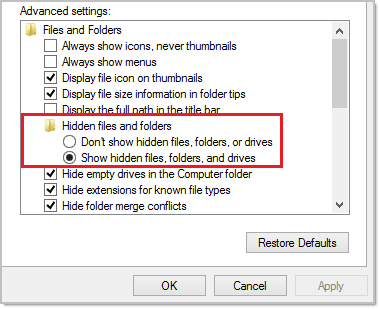
Now the application file for your game should be visible and you can proceed with the following steps to run the game in compatibility mode.

Run game in XP compatibility mode
- From your Windows 8 desktop, move your mouse into the lower-left corner of your screen and right-click.
- Click on File Manager.
- In the File Manager, go to Computer, then Local Disk (C:), then Program Files. From Program Files, locate your game's folder.
- From the game folder, right-click your mouse on the application file (example in above picture) and select Properties.
- Click the Compatibility tab at the top.
- Check Run this program in compatibility mode for: Windows XP (Service Pack 3).
- Click Apply then OK.
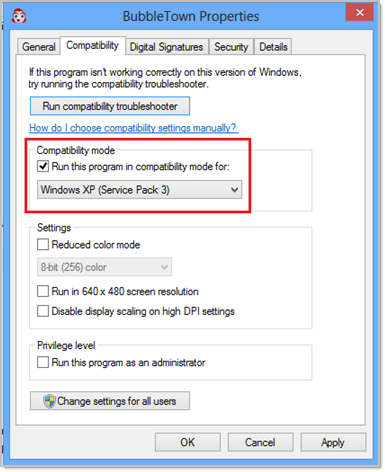
Make sure to start your game by first opening the Game Manager, then clicking the Play button next to the game title.
Disable Aero Setting
The Aero design theme is the standard appearance setting for Windows 8, and it uses more graphics resources than simpler designs. To improve the performance of your game, you can easily disable Aero and use a simpler appearance setting.
- From your Windows 8 desktop, right-click your mouse and select Personalize.
- A window will appear. Scroll down and select one of the Basic and High Contrast Themes. (By using one of these basic settings, you will free up video card memory to be used for your game.)
- When finished, try playing your game.
-
Windows 10
Adjust the Dots Per Inch (DPI) Setting
The Dots Per Inch (DPI) setting affects how images are displayed on your screen. Some games may have trouble displaying if the DPI is set too high or too low. Please check your DPI and adjust if necessary.
- Open the Windows start menu.
- Select Settings.
- In the Settings menu, select System.
- Select Display.
- In this menu, you should see an option that says ‘Change the size of text, apps and other items:' Select the slider for this option and set it to 100%.
- Click the Apply button.
- Restart the computer.
After restarting the computer, please try playing the game again. If the issue continues, please proceed to the steps below.
To help with game freezing and slowness, run the game in XP compatibility mode and/or disable the Aero appearance setting. First, make sure you have the ability to view hidden files:
Show hidden files
- Open the Windows start menu.
- Go to File Explorer.
- Open This PC then Local Disk (C:) and finally Program Files (x86).
- Locate the folder designated by your game’s title.
- In the game’s folder, select View at the top, and then check the box for Hidden Items.
Now the application file for your game should be visible and you can proceed with the following steps to run the game in compatibility mode.

Run game in XP compatibility mode
- After following the steps above to show hidden files, you should see a faded or greyed out icon for the game. Right-Click on the game’s icon and select Properties.
- Open the Compatibility tab and check the box for Run this program in compatibility mode for:.
- From the drop down select Windows XP Service Pack 3.
- In the Privilege Level section, if it's available, select Run this program as an administrator.
- Click Apply then OK to exit the screen.
Make sure to start your game by first opening the Big Fish Games app (Game Manager), then clicking the Play button next to the game title.
Step Four: Uninstall and reinstall your game
Trouble viewing or playing a game can sometimes be resolved by a simple reinstall. Follow the steps below to uninstall and reinstall your game.
To uninstall:
- Open the Big Fish Games app (Game Manager).
- Click the trash can icon next to your game.
To reinstall:
- Visit your Purchase History.
- Click Install Now next to the game.
- Select Run. (If you're using Firefox as your web browser, select Save File.)
- If prompted, click OK or Run to open the game's executable file and start downloading.
If you have not yet purchased the game, find the PC game or find the Mac game and reinstall the trial version (when available) to play any remaining minutes.
For more information, please see the Reinstall a Purchased Game help article.
